Sunday, January 27, 2008

Gift for my niece: Japanese Craft Book and Cute Box Bag filled with goodies


Gift for Lexi
Originally uploaded by purlyshells
For my niece's birthday I put together this gift package. I got her a japanese craft book full of great projects and filled this cute bag with goodies.

Some of the goodies were a strawberry-flavored ring pop, a box of nestle crunch candy stixx, a 3-pack of ferraro rocher chocolates, 2 miniature rolls of ribbon, and some plastic "jewels". I'm sure she's going to make something lovely with the ribbon and jewels. She loves crafting just as much as I do!

I sewed the bag last night and loved how it turned out. The fabric is from superbuzzy. The pattern is from dragoknitfly's Box Bag Tutorial but with a few modifications.

I used a technique from this blog and cut out 1.5" squares from the corners. It really helps to keep the corners even and straight.

I also made my own modification by sewing the lining separately, putting it inside the bag, and handstitching it in place. No messy seams in sight! I will post pictures of how I did this in another post.

Her birthday is on Tuesday. I can't wait for her to open her gift!

Labels: , , , , ,

Monday, January 21, 2008

How to Make a Robot-Themed Birthday Party: 5 Ideas

My little one is turning 3. This year, the birthday party theme was ROBOTS.

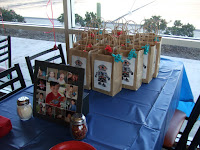
Once I decided on a robot image I brainstormed several ways I could incorporate this theme into the party. I got a photo-cake made, decorated goodie bags with a picture of a robot, and filled each bag with a windup robot, a mini rock 'em sock 'em robot, a rubber ball and of course every kid's favorite treat: candy!


There are several ways you could make your own robot-themed party.

First you need to decide on an image. You could either google and download a royalty-free image from the web, take a photograph of a toy robot, or if you are artistic draw your own robot.


Here are a few ideas on how to incorporate this theme into your party:

***********************************************************
1) Make photo prints of the robot and decorate the party bags with them.

2) Make a large photo print then have your local bakery make a photo cake with it.

I had someone else draw a robot image for me then I scanned the artwork using my scanner at home. I wanted to use this image on the goodie bags and a larger image for a photo cake. The original image was 3.5" by 3.5". Here's a nifty way someone showed me to calculate the scanning resolution:

Multiply 150 (dpi's) by the size you want to print it to (which for me was 8"), then divide that number by the size of your original. Here's how my formula looked:

150 multiplied by 8 = 1200 divided by 3.5 = 342.86

I rounded 342.86 up to 350 and scanned the image in at 350 dpi's. Then I uploaded that image to a photo printing website and ordered 4x6 prints for the goodie bags and an 8x10 print for the cake. I was surprised how great the image looked blown up to an 8x10 print.

I used a corner rounder to trim the corners on the 4x6 prints, then used glue dots to adhere them onto kraft handle bags. I got the bags at Diddams for .70 cents/each but you could also get them online here or on ebay.

I sometimes get cakes at my local grocery store where they have an in-house bakery. They didn't have any robot-themed cakes so I brought the 8x10 robot print and asked them to make me a photo cake with it. You can tell them how you want the borders and edges iced and if you want any other decorations. I wanted to keep things simple so I just picked a photo from their cake book and said decorate it like this but use my photograph in the middle of the cake.

***********************************************************

3) Print the robot image onto labels or magnet sheets to make stickers or fun refrigerator magnets to put in the goodie bags.


You can use good old white mailing labels or make moo stickers like this.

To make custom refrigerator magnets, you can print the image onto these inkjet magnet sheets.

***********************************************************

4) create a stencil of your robot image and either "freezer-paper stencil" or "gocco" print it onto t-shirts to give away as favors.

I think doing freezer-paper stencil shirts would be good if you are having a small party and only have a few to make (say 5 or less). Gocco would be a better choice if you needed to make more than that.

These are some cool shirts someone made:


Stencil-related sites:
Stencil Art...Creating Stencils
Unwind: Freezer Paper Stencils
stencilry (ready-made robot stencils)

Gocco-related links:
Save Gocco (general info).
gocco tutorial on flickr.

If you're going to gocco onto t-shirts, you'll need to use a gocco stamp kit like this:


***********************************************************

5) Fill the goodie bags with robot toys or candy. There are a few places you can get 'em.

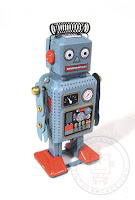
The local party-supply store is a good place (I got these cute windup toys at Diddams!) or you can get toys and candy here:

Robots at Tin Toy Arcade
Robot Pops
Robot Lollipops

and if you're up for it, you could even make your own robot candy using a robot candy mold!

***********************************************************

The day before my son's party, I went shopping for an outfit for him...and what did I find? Robot shirts on sale! And not just one style, but two! I bought both shirts for $10 bucks. I'll post pictures of them as soon as they get washed (they're sitting in the hamper, happily stained with birthday cake).

Labels: , , , , , ,

Thursday, January 17, 2008

Blue and Brown Baby Shower Favors and party update


Here's a shot of the favors arranged nicely at the party. In case anyone is admiring the script on the labels it's actually my handwriting! The darn printer broke the day I was working on them. So I ran out and got a sepia-colored pen and just wrote Thank You in my own writing. It turned out quite nicely. And the mama-to-be liked them which made me very happy!

The party was a success -- we completely surprised my friend. She said she had no idea. Her husband took her to the movies the morning of the party. Then all of us went to their house (our friends' parents let us in) and got to work decorating and getting the food going. It was a potluck so everyone brought their favorite dish. My friend's husband forgot to order a cake so that morning I went to the grocery store and picked up a chocolate cake and had them write on it with blue icing.

When my friend and her husband got home from the movies, we tried to be quiet as they walked up to the front door. Once the door swung open we shouted "Surprise!". She was startled and happy at the same time. I was worried it might be too much excitement but she was fine :)

Labels: , , ,

Thursday, January 10, 2008

Blue and Brown Baby Shower Favors: kraft paper boxes filled with candy pacifiers

We are having a surprise baby shower for a friend and I made some favors to give away at the party. The favors are brown kraft boxes wrapped with a strip of blue paper and tied with brown ribbon. On the ribbon I tied mini blue pacifiers.

The boxes came in a kit from Michael's and in the kit were 50 strips of handmade paper and brown kraft boxes. The mommy-to-be loves the combination of blue and brown so I decided to customize the favors. I created a template using one of the handmade paper strips in the kit and cut out strips of tiffany-blue scrapbook paper instead. My paper cutter came in handy for that! The inside of the boxes are lined with paper baking cups filled with mini candy pacifiers. The candy tastes like sweet tarts (I snuck a taste when I was filling the boxes!).

At first I shopped at Michael's for the candy and the pacifiers but it was too expensive (I was making 50 favors). So I googled for "mini pacifiers" and "candy pacifiers" and found a couple places that sold them for a lot less. I ordered 4 12-ounce bags of the candy and a pack of blue mini pacifiers from ebay for a great deal!

I have an electronic kitchen scale that I used to measure the same amount of candy for each favor. First I placed the box with the paper liner on the scale and zeroed it out. Then poured in candy until it weighed exactly 1 oz. I had exactly enough candy for 50 favors. Amazing!

There were 144 mini blue pacifiers in the pack I bought so I had a lot left over. I decided I will make ribbon necklaces with a pacifier "charm" tied on each. I'll use them for a popular baby shower game that I'm sure a lot of people have heard of. It'll go like this. Each guest will get one necklace when they arrive. Each time they hear someone say the word "baby" or each time they see someone cross something (legs, arms, or ankles) they can take the necklace from them. The one with the most necklaces at whatever cut-off time wins a prize!

Labels: , , , , , ,